There are many different pull-up bars available for home workouts on the market, but for those that have the available space, there’s no better option than a DIY outdoor pull-up bar.
In this guide, we share how to build a rock-solid, sturdy, DIY pull-up bar in your garden or back yard, with photos and information provided by one of our own readers, Thomas.
Thomas is based in the US, so all materials and costs are US-specific, but we’ll add UK versions of sections where appropriate.
Table of Contents
Why would you want to build your own pull-up bar?
If you’ve got the opportunity to build a permanent pull-up bar in your back garden or yard, then a DIY pull-up bar is an excellent choice.
It’s possible to purchase the materials for under $150 / £130, and the end result is a pull-up bar which will be more robust than any other option on the market.
Anybody who followers any of the top calisthenics influencers will see that a lot of their footage is filmed on permanent outdoor pull-up bars – why not build your own too?
What do you need to do before building an outdoor pull-up bar?
Before you go out and buy your materials, you first need to check that you actually have permission to build the pull-up bar.
It goes without saying that you should only be installing the pull-up bar on your own property (and that you have explicit permission from the property owner if that isn’t you), but you also need to check that digging a deep hole on your property will not cause any problems.
When digging a deep hole, you are always at risk of hitting power, gas, water, telephone or internet lines, and potentially cause issues for the whole neighbourhood, or yourself.
Acquiring permissions will be different depending on the country you live in, so please check with your local area.
Getting permission (US version)
In the US, the first thing you should do is contact your local Homeowner’s Association and ask for permission, if you are part of one. The last thing you want is to be digging your holes and have the president of your HOA drive by and say you can’t do that.
Next, you need to fill in an 811 request to dig. Typically you call the number 811, but you can also fill out an online form if there is a long waiting time on the phone.
Each of these steps usually takes no longer than one working day to clear.
Getting permission (UK version)
Annoyingly, the rules aren’t as clear in the UK.
Planning permission is needed for outdoor buildings such as extensions, garages, and other large outdoor structures, but a pull-up bar doesn’t seem to be considered here. We recommend checking the planning permission portal before beginning, although note that any planning applications can take up to 8 weeks.
There are certain services such as LinesearchbeforeUdig and DigDat which can be used to find out if you risk digging into any pipework or lines, but these aren’t very user friendly.
As always, we recommend you proceed with caution.
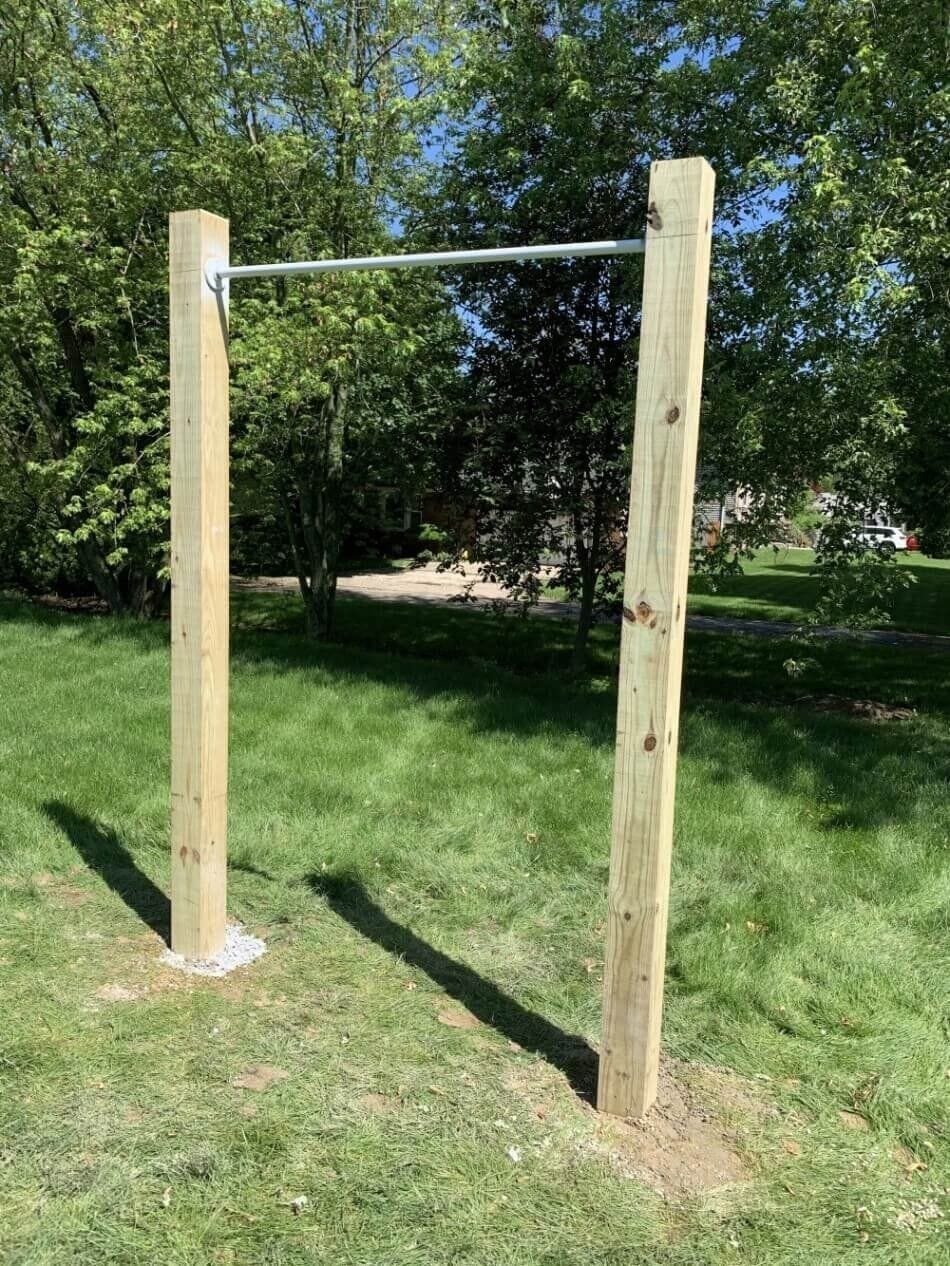
What dimensions should the DIY pull-up bar be?
The bar shown in this guide is based on a pretty typical design to many other pull-up bars you can see online, such as those shown in FitnessFAQs and Brendan Meyers YouTube videos.
Here are the specifications for the pull-up bar:
- 12ft posts
- 4ft deep holes, 10 x 10 inches wide
- 8ft of post above ground
- 5ft bar (5ft in between posts)
You should consider what height you want the bar to be depending on how tall you are, and what your own preference is. Perhaps try out bars in a local park or gym to find the height that works best for you first.
Although a wider bar provides plenty of space to perform freestyle calisthenics skills, we wouldn’t advise placing the posts any further than 5ft apart. Obviously, the wider the bar is, the less weight it can accommodate, and the more chance there will be of the bar bending or breaking.
I’m 5’8, and while many others would consider an 8 ft bar too tall, I find it a perfect height. For the past 3 months during the lockdown, I’ve been working out on my doorway pull-up bar and have had to bend my legs during reps. This bar gives me plenty of clearance and just requires a small jump to grab the bar. It’s also the perfect height to hang rings from.
What equipment do you need to build an outdoor pull-up bar?
Although the materials should be quite similar for most builds, the quantity and size of materials will differ depending on the exact specification of the pull-up bar you wish to build.
Raw materials:
Each item is listed below, with exact prices where found:
- Two pressure treated posts measuring 6″ x 6″ x 12′ from the local lumberyard – $74 excluding delivery
- One galvanised steel threaded pipe measuring 1″ x 5′
- Two 1″ threaded steel floor flanges
- Four 2 x 4 x 8’s (to hold the posts in place while the concrete sets) – $3 each
- Eight bags of 60 lb concrete mix – $2.30/bag
- One bag of general-purpose gravel
- Rust-oleum enamel white spray paint
- At least eight 3.5″ deck screws (one for each screw hole in the flanges, plus spares if needed)
With the exception of the pressure treated posts, all other items were from Menards. Although the posts were purchased from the local lumberyard, they could have also been purchased from Menards, Home Depot, or Lowes for around $30.
Note: Some other examples online use 4″ x 4″ x 12″ posts which would be much cheaper, but may not be as sturdy. 6″ x 6″ x 12″ may be overkill, but it’s worth it for the extra confidence in the structure.
Total cost: $164.
Tools required:
- Power drill
- Post hole diggers
- Shovel
- Wheelbarrow
- Post level
- Standard straight 4′ level
A step-by-step guide to building your DIY pull-up bar
Step 1: Prepare the galvanised pipe and flanges
Clean off the galvanised pipe with some dish soap to remove any dirt and dust.
Once dry, spray the pipe with the Rust-oleum. This has two benefits:
- It prevents rust and helps the bar survive the elements better
- The white paint keeps the bar cooler in the summer since white deflects light as opposed to black, which absorbs it
Repeat the above steps with the flanges.
Step 2: Connect the pipe and flanges to the posts
Mark the posts with a Sharpie where you plan to drill the flanges. In this example, the flanges were measured 8″ down from the top of the post.
Editor’s note: There are two different methods for installing the flanges to the post. The ‘flange-inside post’ method has been used in the example here, but an alternative ‘through post’ method may be preferable to those wanting to make their installation extra robust.
In the ‘through post’ method, holes are drilled through the posts, and the bar is pushed through the holes, and then connected to flanges which are attached on the outside of the posts.
Once you have marked where the flanges will go, use the deck screws to drill the first flange into one of the posts, and then screw the pipe into the flange.
Next, screw the second flange into the other end of the pipe. The reason for attaching the second flange to the pipe instead of to the second post is that, if you don’t do it this way, the only way to thread the flange onto the bar would be to rotate the entire 12′ post to screw it in. You do NOT want to be doing this!
To finish, drill the second flange into the second post to complete the installation of the bar to the posts.
Step 3: Dig the post holes
Since the bar was built in step 2, you should now be able to use the structure to measure where the holes need to be. Digging the holes AFTER the bar is built is much better than BEFORE the bar is built since you won’t risk getting the hole locations wrong.
In this example, the holes were built to be 4ft deep, and the area was roughly 10″ x 10″ to allow a decent amount of space for concrete once the posts were put in.
Tip: The rough rule of thumb for digging post holes is to dig them at a depth of 1/3rd of the post height. Since the posts here are 12ft long, the depth of the hole was therefore 4ft.
How long it will take you to dig the holes may depend on the quality of the ground you are digging into.
It took us roughly 2.5 hours to dig the 4 ft holes. After digging about 6 inches with the shovels alone, the post hole diggers got us to around 2.5 feet deep. We hit some dead roots and a super annoying layer of clay. We used a bar digger to break up the hardened clay and keep the holes uniform.
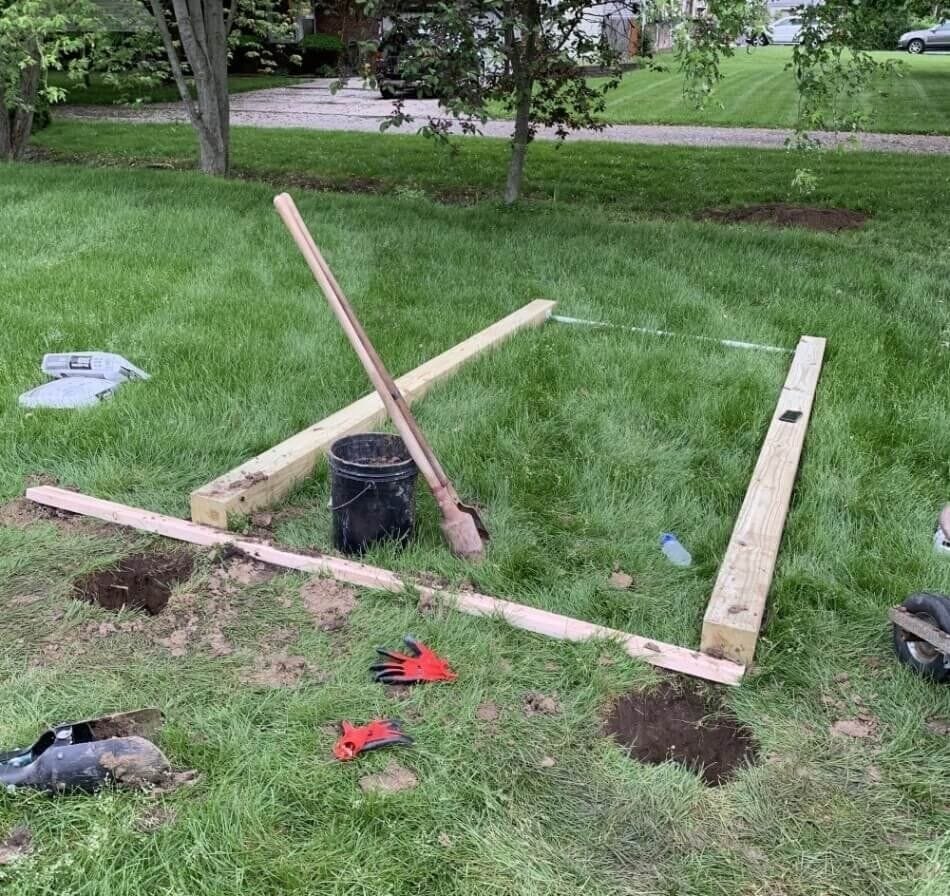
Step 4: Add gravel and check the holes are level
Once you have both holes dug up, pour a light layer of gravel into the holes and check that the base of both holes is level.
To do this, you can place two of the supporting 2 x4x8’s in the holes, and lay the third across the top like a bridge. Place the straight level on the top plank to check the structure is level. If the holes aren’t level, re-adjust by pouring a little extra gravel into the relevant hole and check again.
Step 5: Install the posts
Important: For this part, you will absolutely need a friend to help you, as you’ll both need to lift the structure into the holes and one person will need to hold it steady while the other person pours the concrete mixture into the holes.
First, you’ll want to prepare the concrete mixture in a wheelbarrow (or alternative container), so it is ready to pour into the holes.
Once you have your mixture ready, push/slide the structure into the two holes and adjust the structure, so that it stands upright.
Use the post level on all sides of each post to ensure the structure is level, and adjust if not. At least one person should keep holding the structure, so it remains straight, and you can use the sacrificial 2x4x8’s as props against the posts to help keep it steady.
When you’re happy the structure is level, carefully start pouring the concrete into the holes, adding to each hole a little at a time, until the concrete is the same height as the surrounding ground surface.
Remember to keep using the post level to check that each post is perfectly straight and that the bar remains perfectly horizontal.
Once you’re happy that everything is straight, ensure the 2x4x8’s that are propping up the structure are rigid and leave overnight. In this example, the props were temporarily drilled into the posts to keep it braced, but you can do use any alternative method, so long as you’re happy that the structure will remain propped up while the concrete sets.
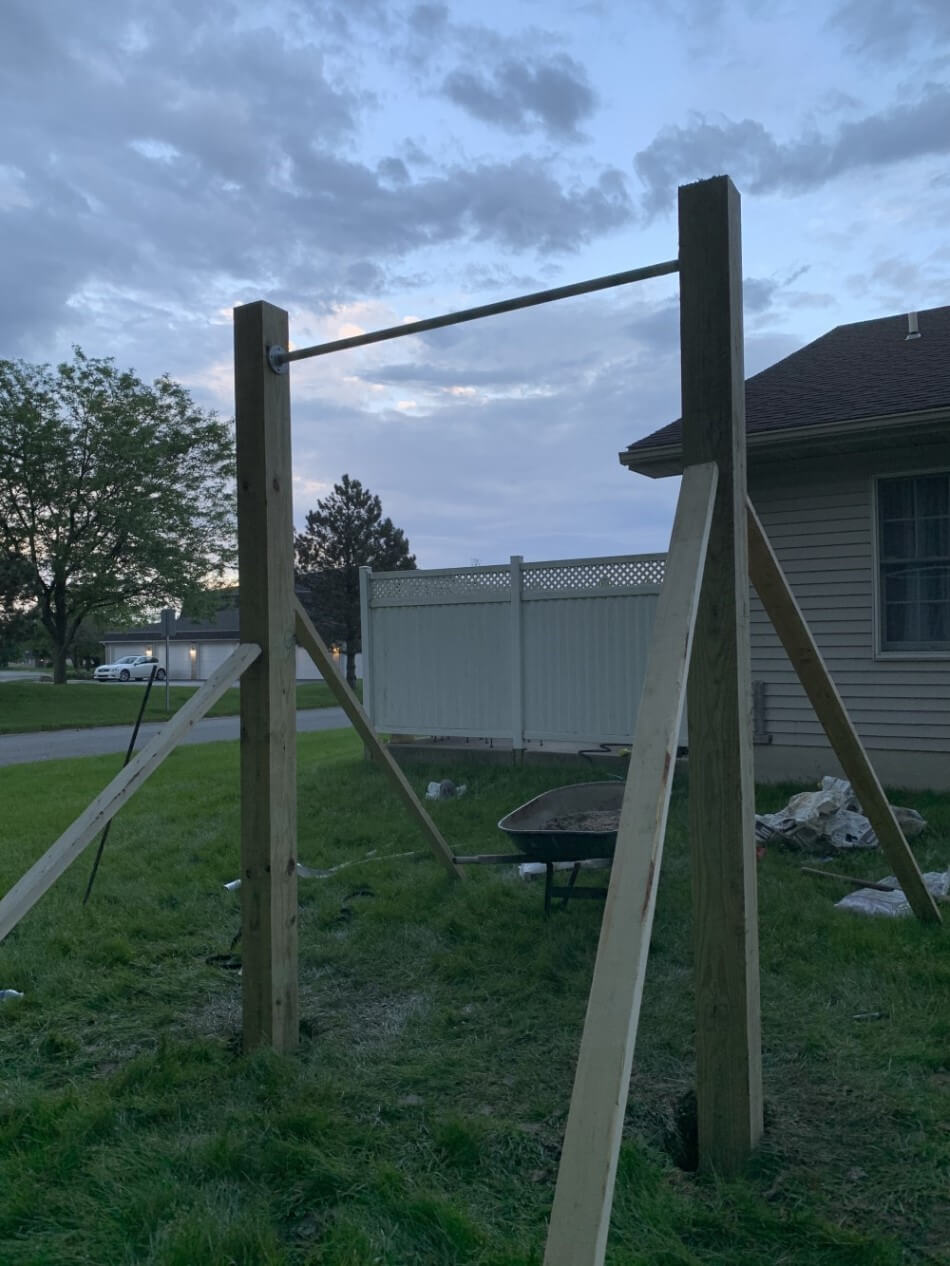
Due to the size of the posts and the depth of the holes, the structure won’t be at risk of toppling. The braces are only used to keep it perfectly straight while the concrete sets.
You will need to leave the structure for at least 48 hours to fully set before you can use the pull-up bar.
Questions and Feedback?
There is a lot of conflicting information on the internet about how to build a homemade outdoor pull-up bar, but it is important to understand that every installation will be different.
If you have any questions about the process, then please leave a comment below.
Have you built your own outdoor pull-up bar and would like it to feature here? If so, feel free to leave a comment or get in touch with any photos you have, and we will add them to our showcase.
Related: How to Build Your Own Calisthenics Gym at Home

Founder of www.calisthenics-101.co.uk. Training calisthenics since 2012.
Currently working on: 30 second one-arm handstand, muscle-up 360, straddle planche.
Great post, love the concept. Especially in these corona times when all gyms are still closed.