
Pull-ups are one of the most fundamental bodyweight exercises but a large percentage of people cannot achieve a single unassisted pull-up. This can be off-putting for those who see the basic pull-up as a pre-requisite for a bodyweight workout and can be demotivating those who are unable to complete a single pull-up.
In this guide, I’m going to teach you everything you need to know to achieve your first unassisted pull-up.
Table of Contents
How many people can do one pull-up?
Working towards your first pull-up can be just as much a mental battle as it is a physical battle, especially if you are feeling sub-par as most others can perform a pull-up and you can’t.
But just how many people can do a pull-up, unassisted? In a recent survey by Calisthenics 101, 20% of males and 69% of females said they could not perform a pull-up.
Further reading: Case Study: What percentage of people can perform an unassisted pull-up?
Why would you want to achieve a pull-up?
Achieving your first unassisted pull-up is a fantastic feeling and is something anybody would be proud of achieving.
Apart from your own personal goals, there are many other benefits which can be achieved by working towards your first pull-up.
Pull-ups are fantastic exercises for strengthening the back muscles, and can ultimately be hugely beneficial for improving posture.
Pull-up strength is useful for those who are interested in Tough Mudder or Spartan type obstacle races, especially as you will face a number of obstacles that require you to pull your body weight up and over obstacles.
Those who are interested in Calisthenics and Crossfit classes may feel like a pull-up is a pre-requisite of joining these classes, and being able to perform a pull-up will increase your level of confidence when attending classes with others.
Using progressions and assistance to improve pull-up strength
The ideal goal is to be able to complete a fully unassisted pull-up, that is, pulling yourself up from a straight-armed dead-hang position, until your chin is above the bar, without any help.
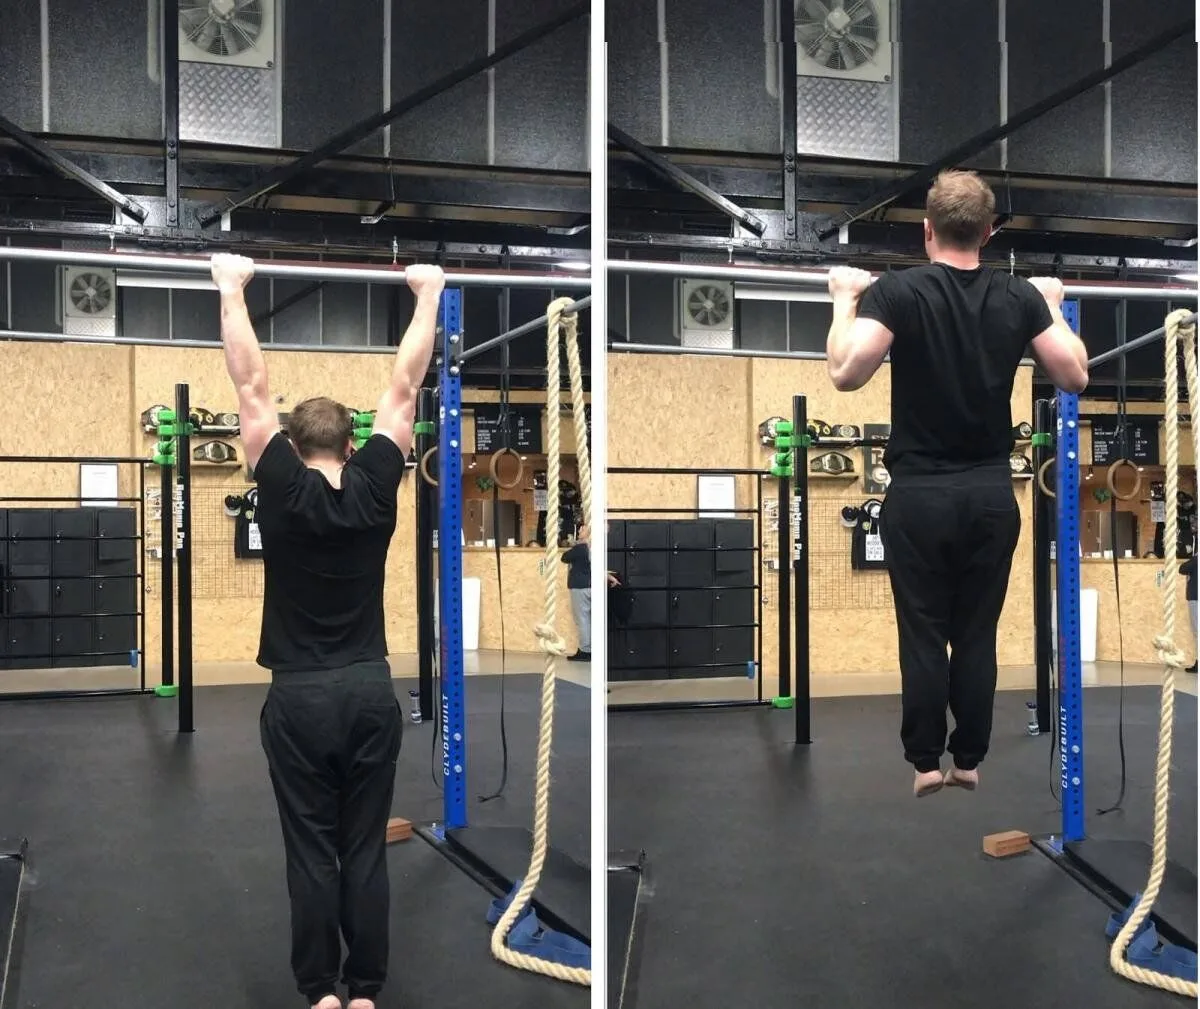
Above: Demonstration of the correct starting position in full dead-hang (left) and the end of the rep with chin above the bar (right).
But if you are a complete beginner, being able to do this will be a bit like jumping from 0 to 100.
Instead, we will work through different pull-up progressions of increasing difficulty, that way you’re taking smaller steps in order to achieve your end goal.
The idea of a progression is to work on an easier variation of an exercise in order to build the strength required to do the full version of the exercise.
This is easy when using a resistance machine in the gym – you can simply increase and decrease the weight by moving the pin – but when working with bodyweight exercises it isn’t as simple as ‘changing your bodyweight’, so we’ll need to turn to more creative variations of the exercise to mimic the same effect.
Pull-up progression exercises
The exercises listed below are the most suitable pull-up progressions that you can train in order to work towards your first unassisted pull-up. All you will need to complete the progressions is a pull-up bar.
Each exercise is listed in difficulty order, from easiest to hardest, so start with the first pull-up progression exercise on the list and only progress onto the next progression when you can perform 4 – 6 reps of the current exercise.
The most optimal training plan would be to train each exercise in sets of 3, with 1 – 3 minutes rest in between each set, and performing the routine no more than twice per week.
Important: When performing any pull-up progression exercise your primary focus should always be on maintaining correct form. Each rep should start with your arms fully extended and should end with your chin above the bar. This ensures your muscles are engaged throughout their full range of motion.
1. Australian pull-ups (bodyweight rows)
An Australian pull-up is a pull-up movement performed on a pull-up bar positioned around waist to chest height with the feet planted on the ground at all times throughout the exercise.
With your feet on the ground, the end result means that your body should be positioned somewhere between 30 to 60 degrees to the bar (as opposed to hanging vertically), and as such when performing the pull-up, you will only be pulling a portion of your body weight up to the bar during this progression.
One thing that can be difficult with the Australian pull-up is managing to get yourself into a position where your body is at a perfect angle to the bar, in order to create an ideal bodyweight resistance.
Let’s compare the following two scenarios…
If you’re a taller person or you’re using a bar that is low on the ground, you will find your feet are positioned further away from the bar and as such your body will be at a lower angle to the bar. This will make the exercise harder, and if your body is angled too low to the ground, the pull-up will instead become a body row.
If you’re a shorter person or you’re using a bar which is too high from the ground, you will find your feet are positioned close to the bar and as such your body will be at a much higher angle. This will make the exercise easier but could result in the becoming too easy whereby you won’t get any benefits from the exercise.
Ideally, try to find a position which is challenging for you and adjust as necessary. The easiest way to do this is to use a slightly higher bar, but then position your feet on an object such as a box or chair to help get the ideal angle.
If the exercise becomes too easy, then simply move on to the next progression.
Unrelated note: Variations of an exercise which are named after a country are usually very challenging (see the Turkish Get Up or Romanian Deadlift). The Australian pull-up is the only exception to this rule – enjoy it whilst you can!
2. Jumping pull-ups
Jumping pull-ups may sound like cheating to some people, but the progression is an effective technique to help train the muscles needed to perform a strict pull-up.
To perform a jumping pull-up, find a lower bar (or stand on a box) so that you are in a slight squat position and holding the bar with extended arms. From here, use the help of a light jump to help you pull yourself up.
3. Band assisted pull-ups
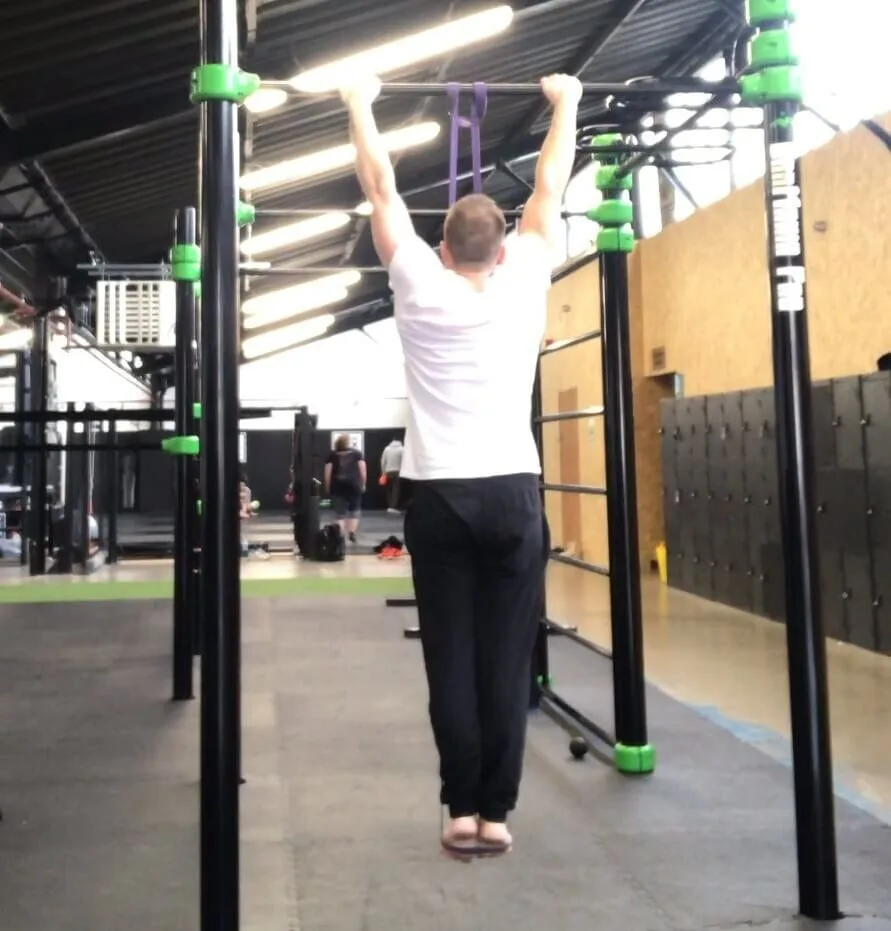
A set of resistance bands are a must have for any bodyweight enthusiast’s gym bag as they can be used to create progressions of almost any bodyweight exercise by supporting part of your body weight.
In this progression, the resistance bands are used to partially support your weight when performing a regular pull-up; simply loop a resistance band over the bar, grab hold of the bar and get into the pull-up position, then place your feet into the loop of the band so that the band is helping to support your weight.
For this progression, find a resistance band that gives you enough support so that you can complete a standard pull-up without it being too easy.
Ideally, you will want to have a set of resistance bands so that as you get stronger you progress to using the lighter bands which provide less support.
4. Negative pull-ups
‘Negatives’ is a term you may hear occasionally in the world of calisthenics and refers to the method of eccentric training.
In simple terms, rather than focusing on the contracting part of the exercise (the pull motion in this example) negatives work on the lengthening phase of the exercise (the downward descent in this example).
To perform a negative pull-up, start in the topmost position of the pull-up with your arms contracted and your chin above the bar. From this position, slowly lower yourself down to the dead hang position, ensuring the movement remains slow and controlled.
When performing reps of negatives, you shouldn’t exert yourself to get back into position for each rep. For a negative pull-up, you can get back to the starting position of each rep by either simply jumping up and grabbing the bar, or by using a box to climb back up into the starting position.
Remember: You MUST keep the negative pull-up movement slow and controlled to make the most of this exercise. If you find you aren’t able to control the movement, move back to an easier pull-up progression until you build more strength.
5. Chin-ups
Chin-ups are the most similar exercise to a standard pull-up.
Don’t let the name fool you; your chin should still be above the bar at the top of any pull-up type exercises, but the difference between a chin-up and a regular pull-up is how you grip the bar.
With a pull-up, you grip the bar with your palms facing forward (an overhand grip), whereas with a chin-up you grip the bar with your palms facing towards you (an underhand grip).
The difference in grip changes the types of muscles used in the exercise. With a regular pull-up, there is much more focus on your back muscles, whereas with a chin-up there is more focus on your biceps.
For this reason, many people find the chin-up easier than a regular overhand grip pull-up.
Pull-up tips for beginners
When you have progressed through the previous pull-up progression exercises correctly, you should then be able to perform at least one strict pull-up and can continue to build the number of reps you can perform from there.
If at any point you have struggled with a progression, or would simply like to tidy up your form then read the following pull-up tips to help you improve your pull-up.
How to stop swinging
A swinging motion will make each rep feel harder and will also give your pull-ups the appearance of bad form, though it’s very common to find yourself naturally swinging, not out of choice!
If this is you then try the following to stop swinging during pull-ups:
- Keep your feet crossed whenever you are hanging from the bar
- Fast pull-ups are more likely to introduce swinging; a slower pull-up through the full range of movement will stop this and is also much more beneficial (and impressive) than fast pull-ups, which may jeopardise form
- Focus on the back muscles that your body is using throughout the exercise and make a conscious effort to keep all the muscles engaged
Gripping the pull-up bar
People who are new to bodyweight exercises may find that they struggle with gripping the bar. Gripping the bar incorrectly can be uncomfortable and will likely hinder your ability to learn and perform a pull-up.
There are three things to take into account here when gripping the bar:
- Where the bar sits in your hands
- Where you position your thumbs (grip style)
- How far apart your hands are when gripping the bar
Most people wrap their hands around the bar in a way where the bar pushes into their calluses at the top of the palms, but actually, the bar should sit at the base of the fingers before the first knuckle, as shown in the diagram below:
As for your grip method, this is totally down to preference. I previously used an overhand grip (thumbs over the bar), but have recently switched to an underhand grip (thumbs under the bar) as this is more beneficial for freestyle calisthenics moves which require swinging around the bar.
The two different grip styles can be seen below:
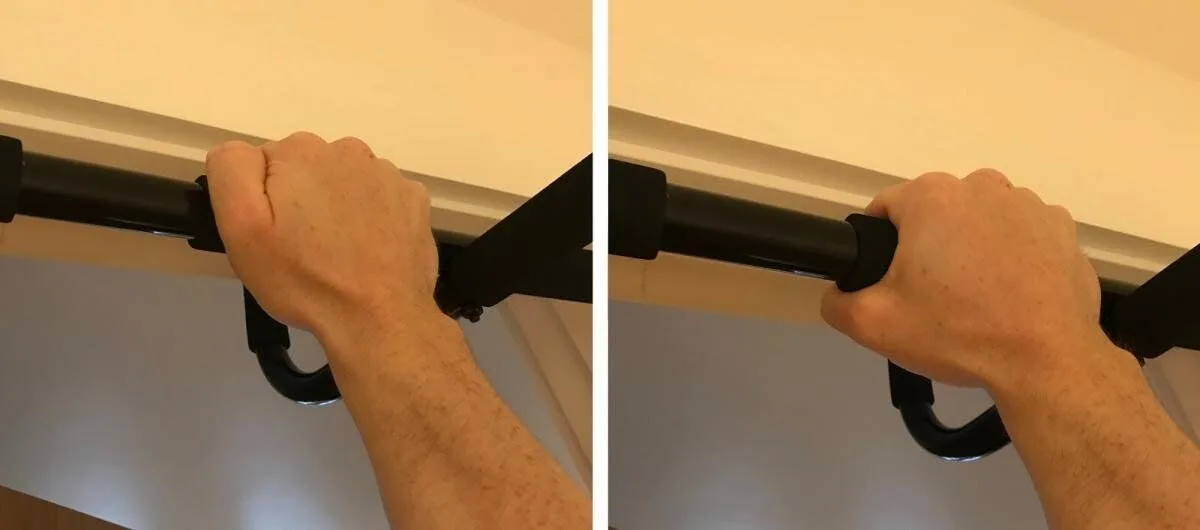
Above: Overhand pull-up grip (left) vs Underhand pull-up grip (right).
In terms of hand position, you should ideally position your hands at a shoulder-width distance apart when performing regular pull-ups. Of course, you will find that more advanced variations of the pull-up use a wider or narrower grip.
Lastly, it’s always a good idea to invest in a chalk ball to help keep your hands sweat-free and prevent slipping on the bar. These are very cheap and are extremely helpful in looking after your hands!
Got a friend in need?
I hope you’ve found this guide helpful and are well on your way to achieving your first pull-up.
If you know someone who struggles with strict pull-ups then please feel free to share this guide with them, or simply share the guide on social media using the share links on the left of the page!

Founder of www.calisthenics-101.co.uk. Training calisthenics since 2012.
Currently working on: 30 second one-arm handstand, muscle-up 360, straddle planche.
Thank you for this begginers guide on how to achieve your first pull up. I really appreciate the information in this article. More power!
How many reps should we do per set?
I typically aim for 8-10 reps per set, but as you move through progressions you will find your numbers change dramatically.
If you are working on a lower progression, then I’d suggest moving to the next progression if you can perform at least 8 reps of the current progression.
On the other hand, if you are unable to perform 2-3 reps with good form then drop down a progression.
You may also wish to mix progressions in a set. For example if you can perform 5 pull-ups for 1 set, but your numbers quickly drop on a 2nd and 3rd set, then use a band for the 2nd and 3rd sets.
Although the above progressions show the full range, from COMPLETE beginner to a proper pull-up, I think most people reading this would be best focusing on band-assisted pull-ups. You can purchase a mix of resistance bands and find one that helps you perfectly without too much, or too little help.